No. 194: O Scale National and Proto48 USRA Box Car Model

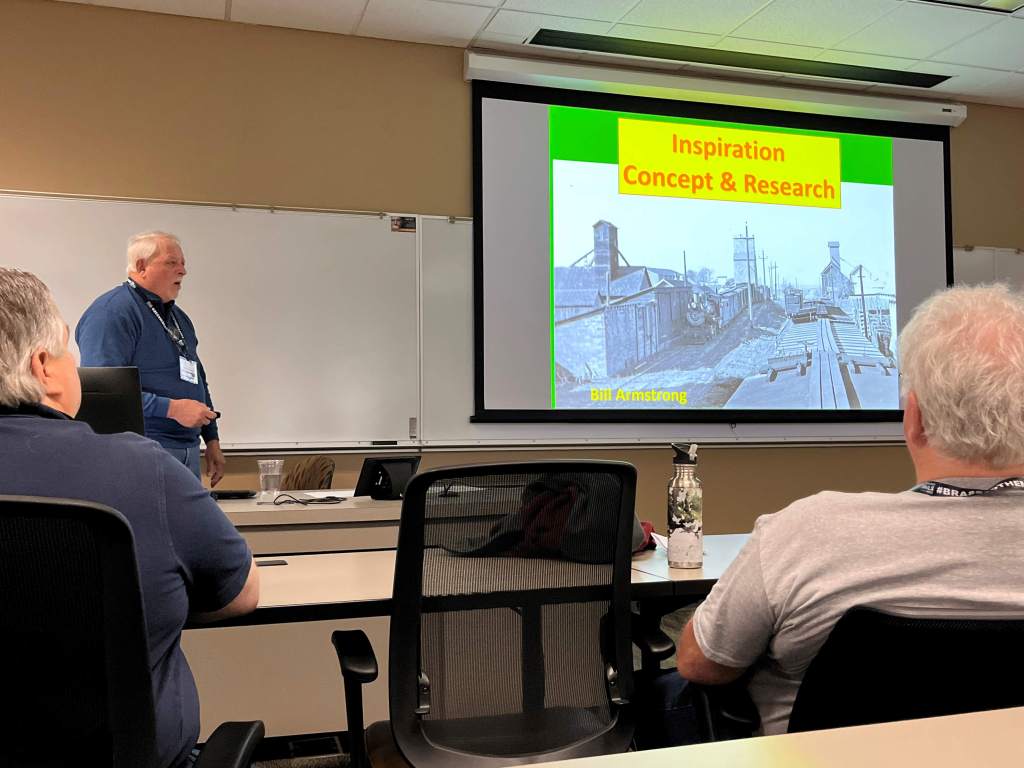
On Saturday, March 23rd I made the all-day trek from St. Louis to Chicago to attend the O Scale “National” at Lombard, Ill. The venue was the beautiful Westin Lombard, same as last year, and there was a lot going on. I went up for the day and spent a few fun hours talking to friends and also buying some harder-to-get models, then headed back home in the evening.

I like starting a trip report with a driving picture. It makes me feel like I went somewhere. This northbound on I-55 in Illinois. This picture makes it look an awful lot like Kuwait.

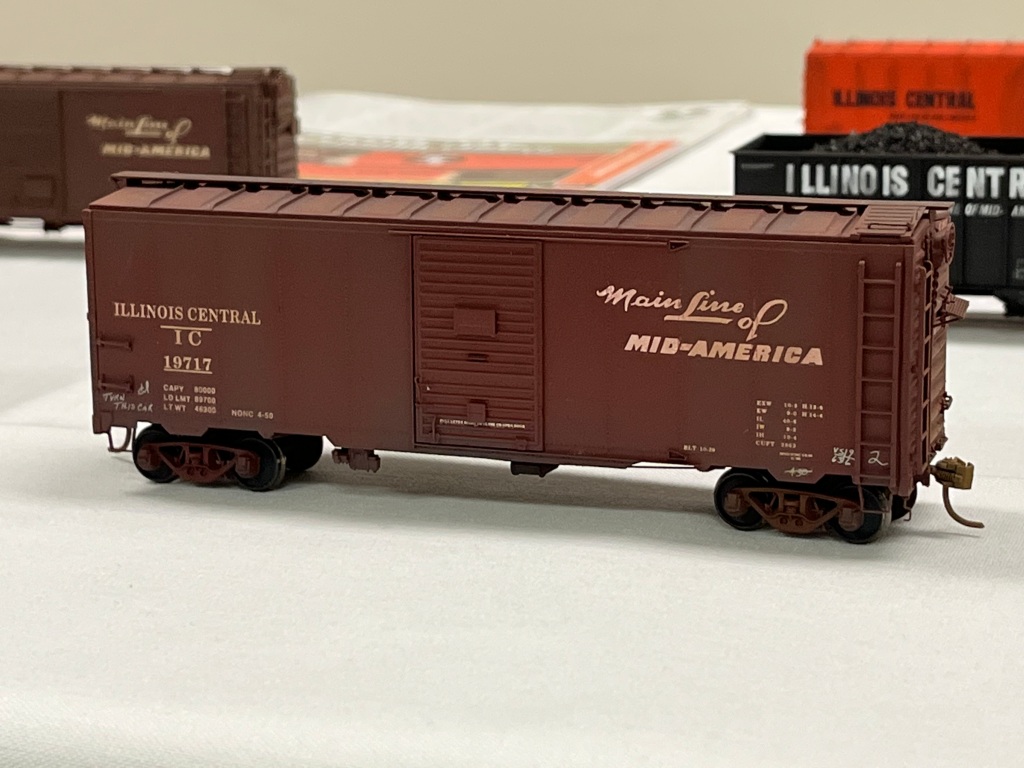
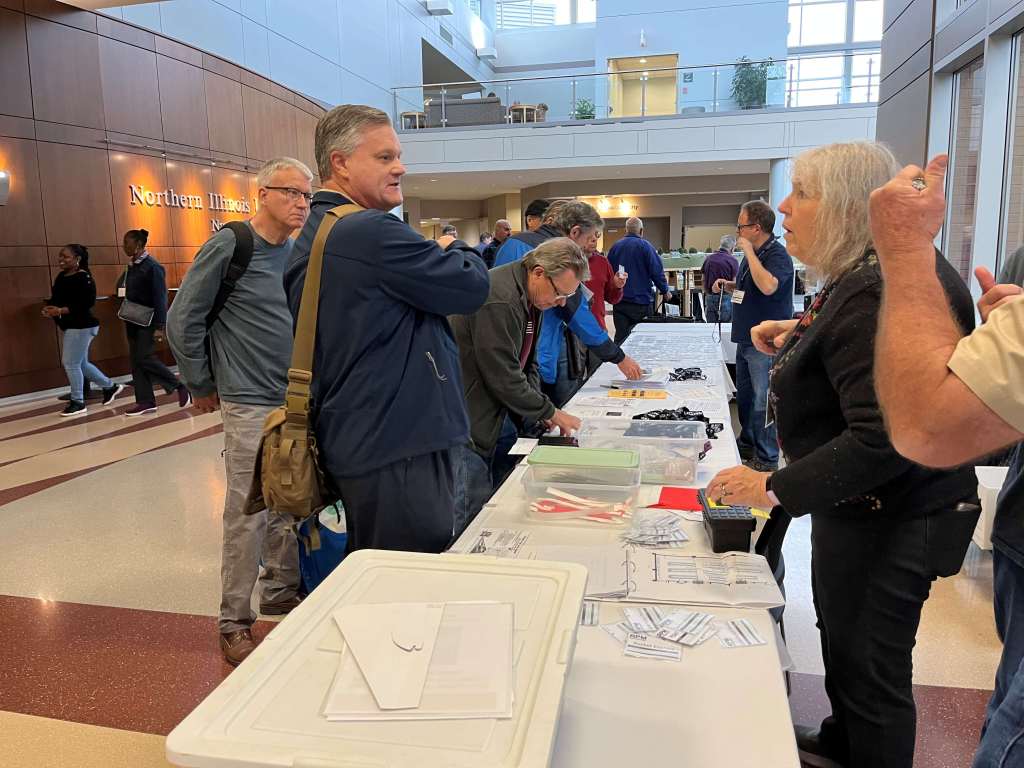
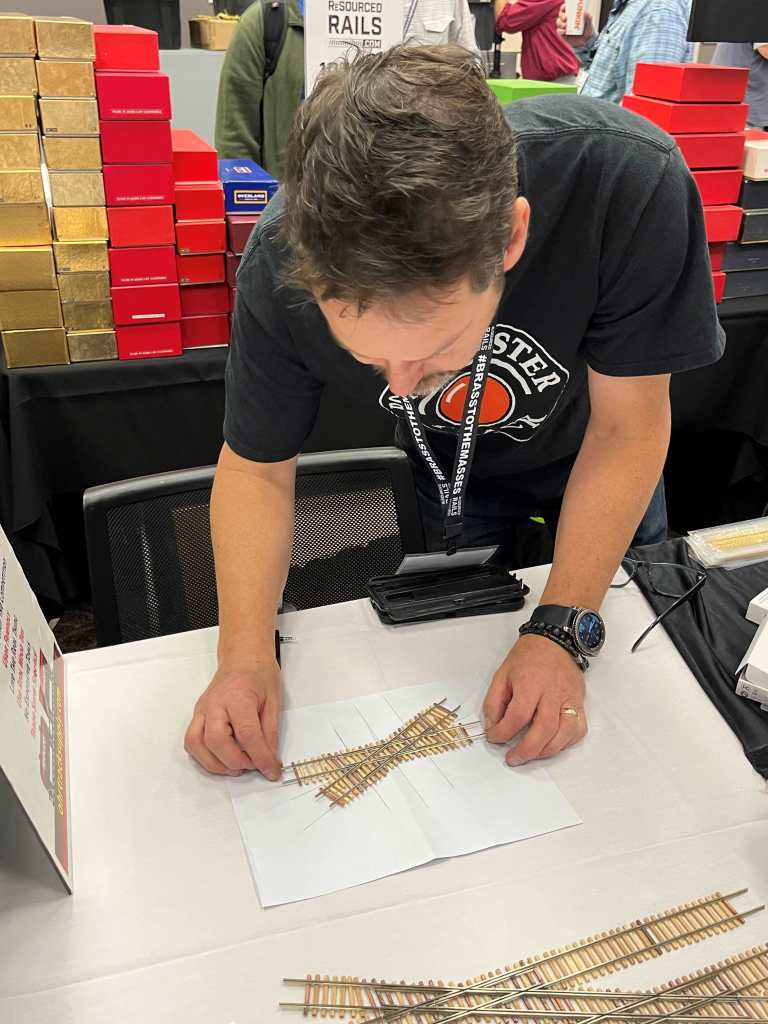
The vendor room is where a lot of the action happens. There are layouts and historical societies, plus plenty of vendors. I bought three freight cars and some detail parts and called it a day.

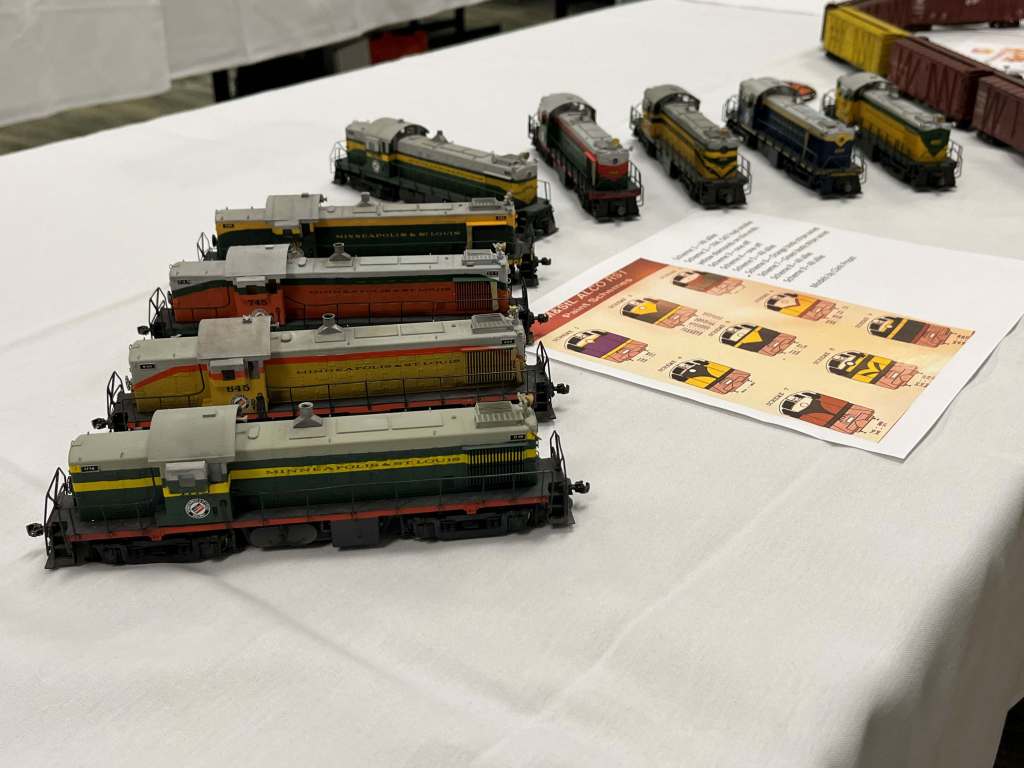
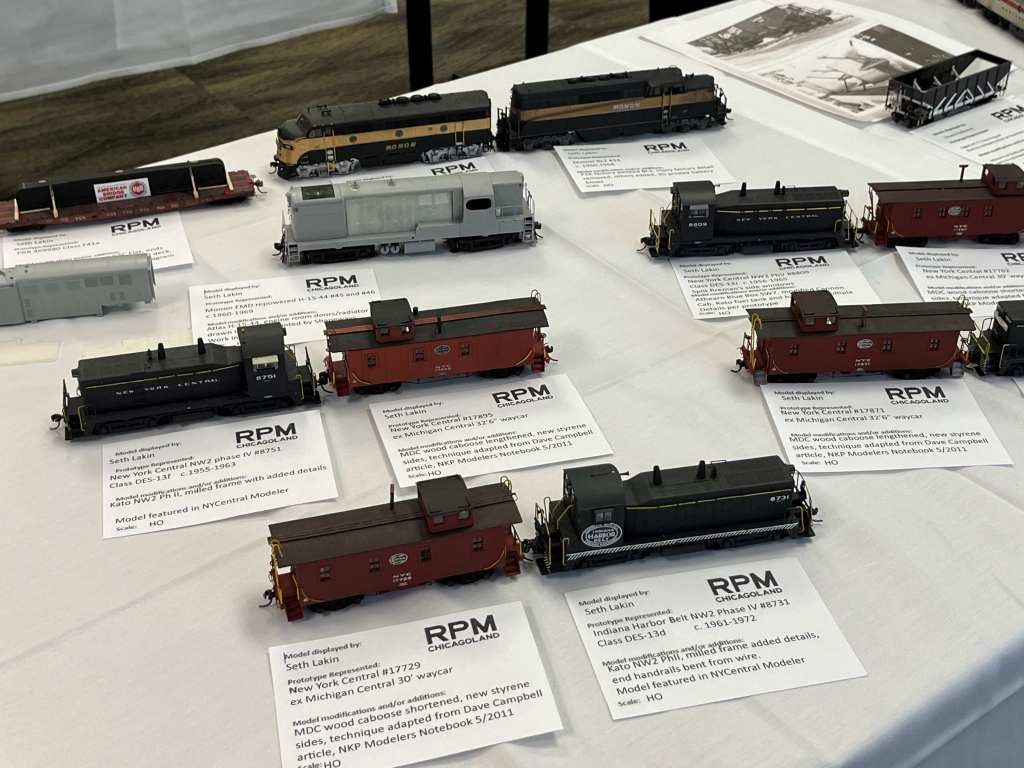
Here is a view of some of the vendor tables. Lots of brass, engines, books, detail parts, and neat models on display or for sale.

Even though I wasn’t there too long, I came home motivated to finish a few O scale models that I’ve been working on for a few months.

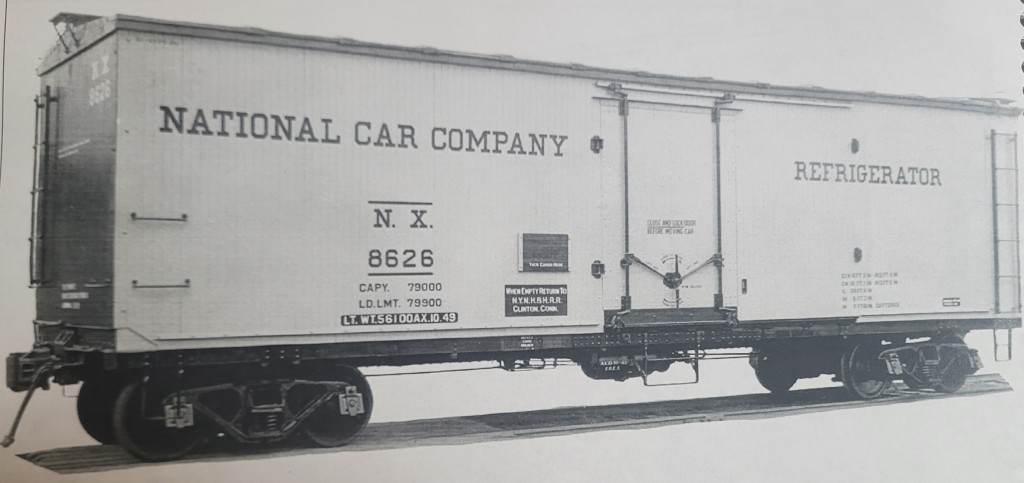
O Scale USRA Double Sheathed Box Car

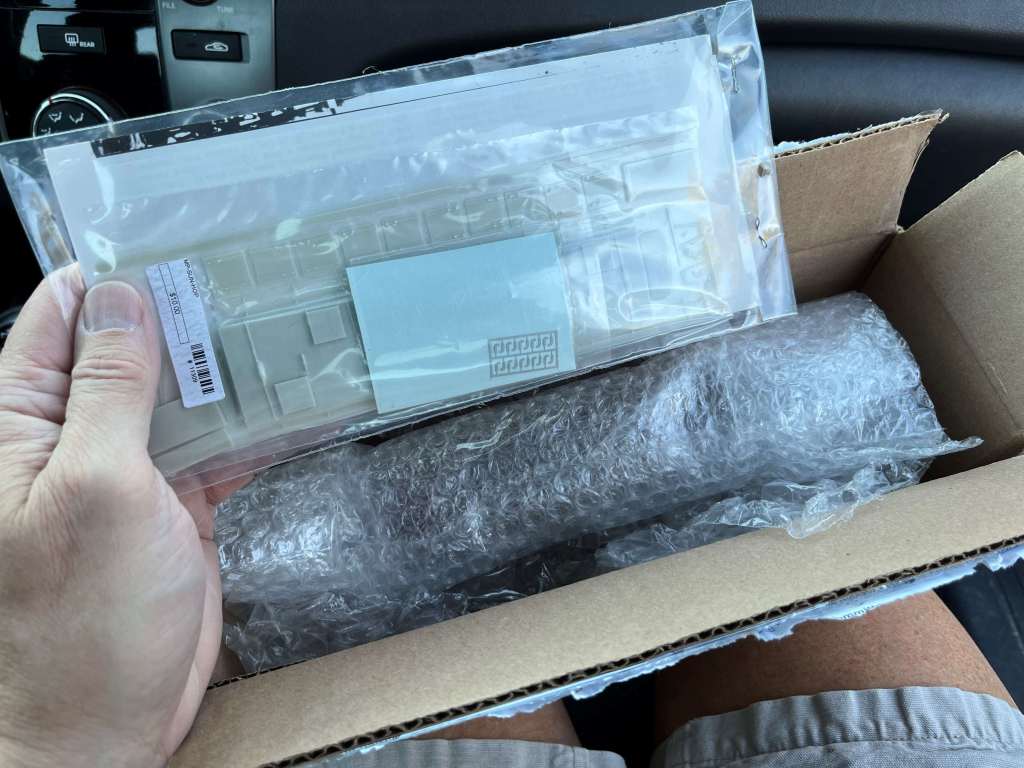
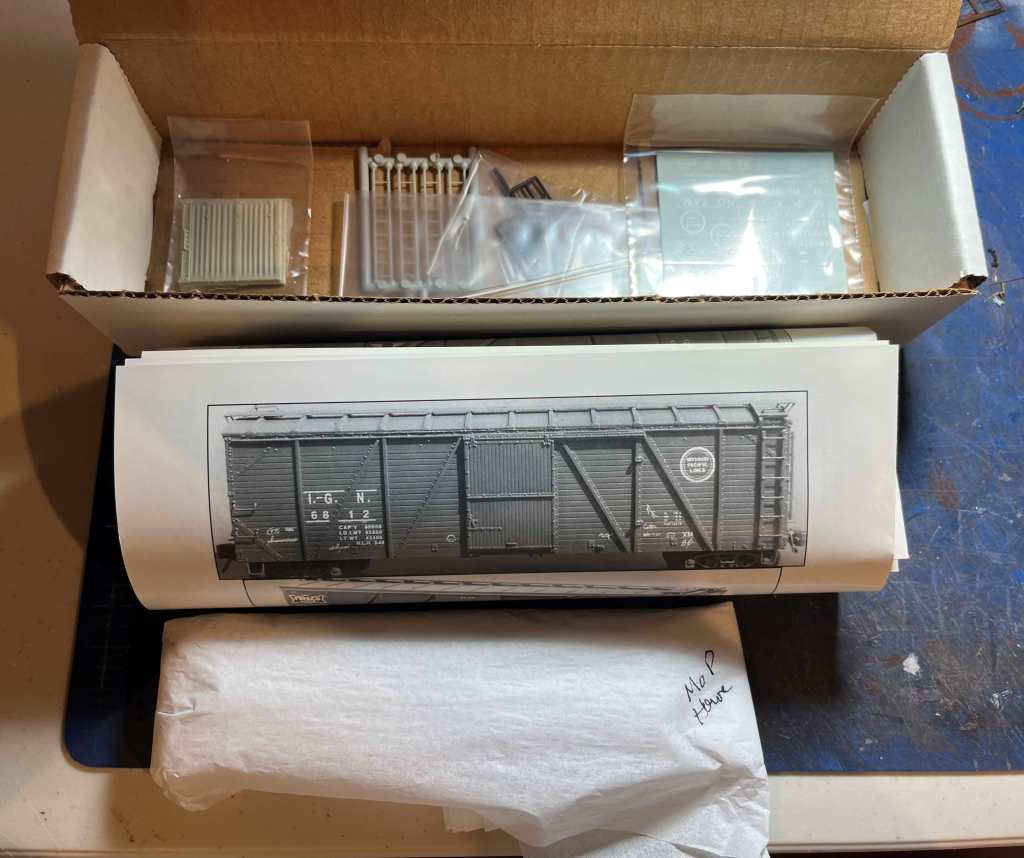
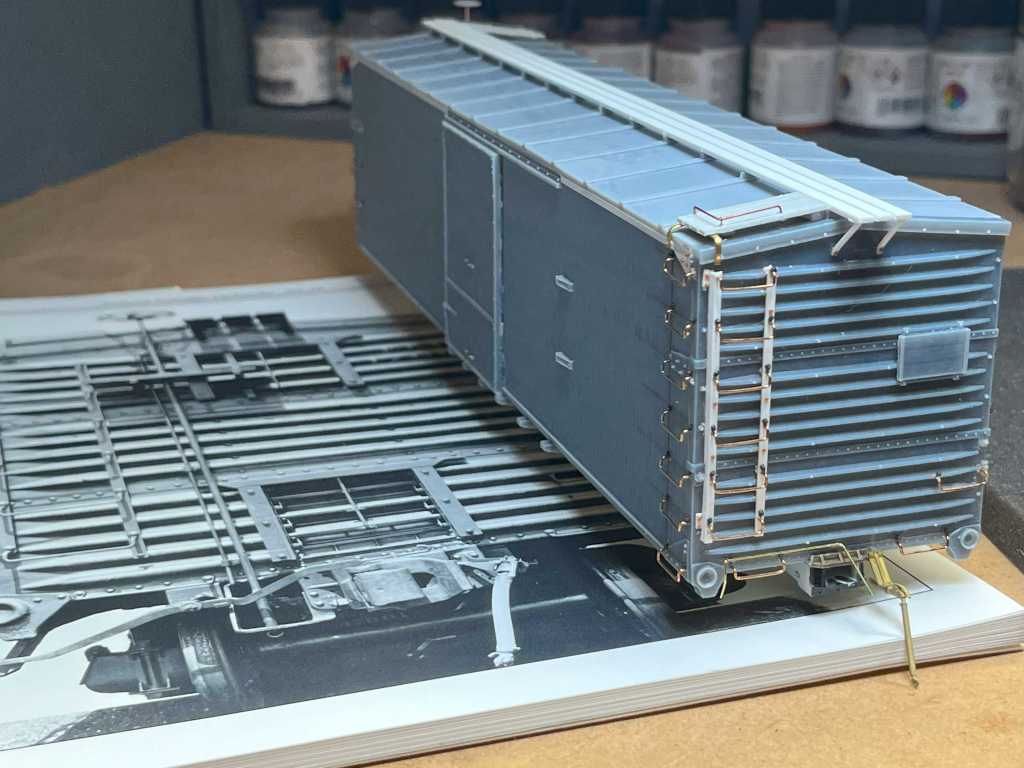
The beautiful models I saw at the O Scale event encouraged me to finish a model I’ve been working on since January—this Rails Unlimited USRA double-sheathed box car. The model comes like this, below–as a built-up one-piece body ready for detailing.

Aftermarket items include Proto48 trucks and wheelsets, a San Juan AB brake gear set, Tichy grab irons, Protocraft coupler boxes, Kadee No. 745 couplers, and a whole lot of brass wire of various types (round and flat), brass tube, eyebolts, rivets, and bigger stuff required to work in the bigger scale.

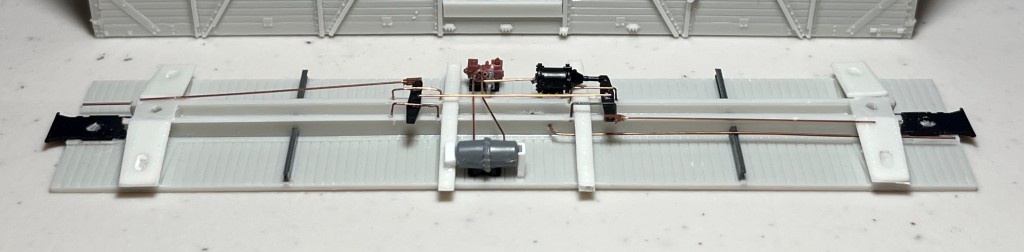
I built up the underframe first. I had to repair a bang in the fishbelly underframe, and cut out the slots for the brake hangars, before I could begin adding parts. The San Juan detail set is exquisite. I attached the major brake components per a prototype photo in RP Cyc No. 16.

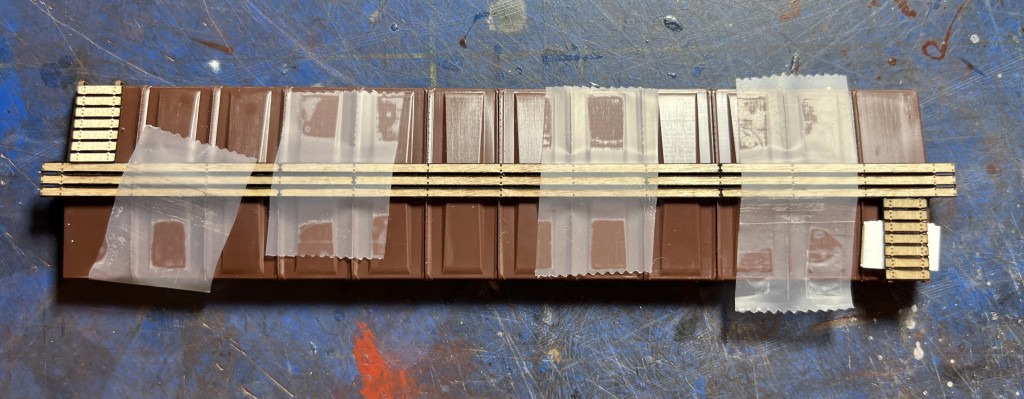
The sides were a simple build. I added the grabs, NBW castings, and also a fascia strip made of styrene strip to the top of the sides. The fascia strip helps identify the model as a more modern car.

The ends were difficult, as I had to scratchbuild the ladders. I measured and fastened the ladders in place using an L-girder styrene strip for the left stile and flat styrene strip for the right stile. It turned out alright—not great, but passable. Next time I’ll build a jig and build the ladders on the bench, then apply them to the model in one piece. I thank that would lead to a cleaner appearance. The rest of the parts are fashioned from brass or styrene parts.

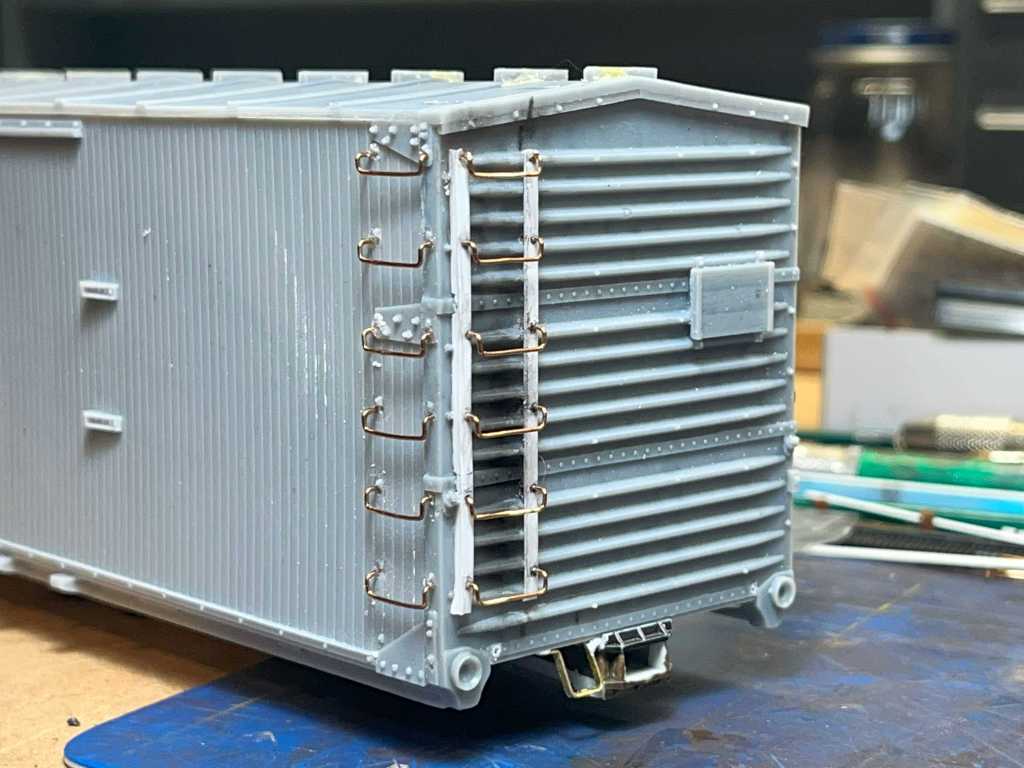
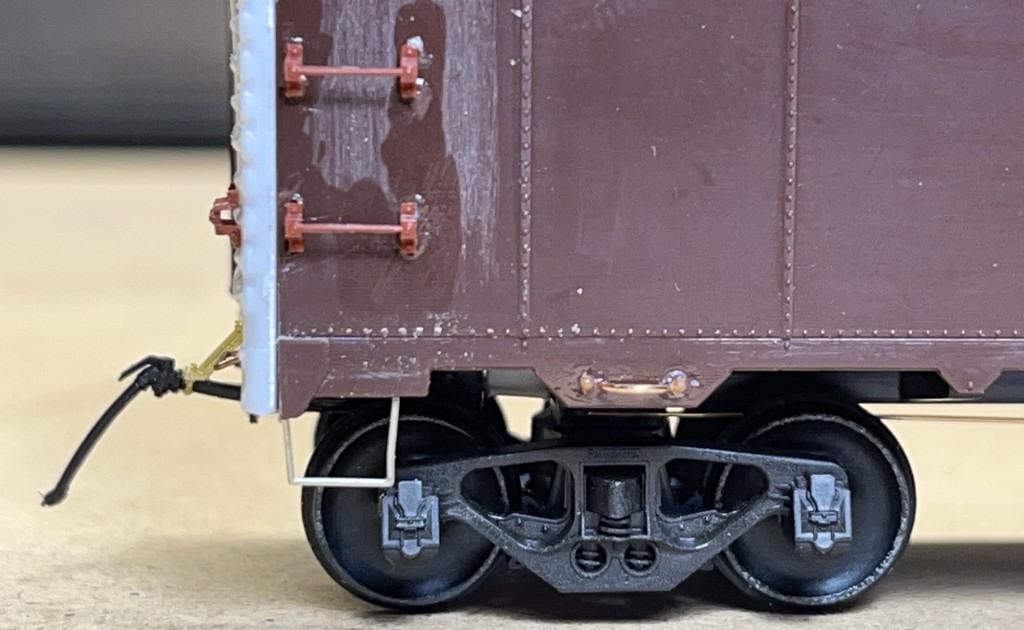
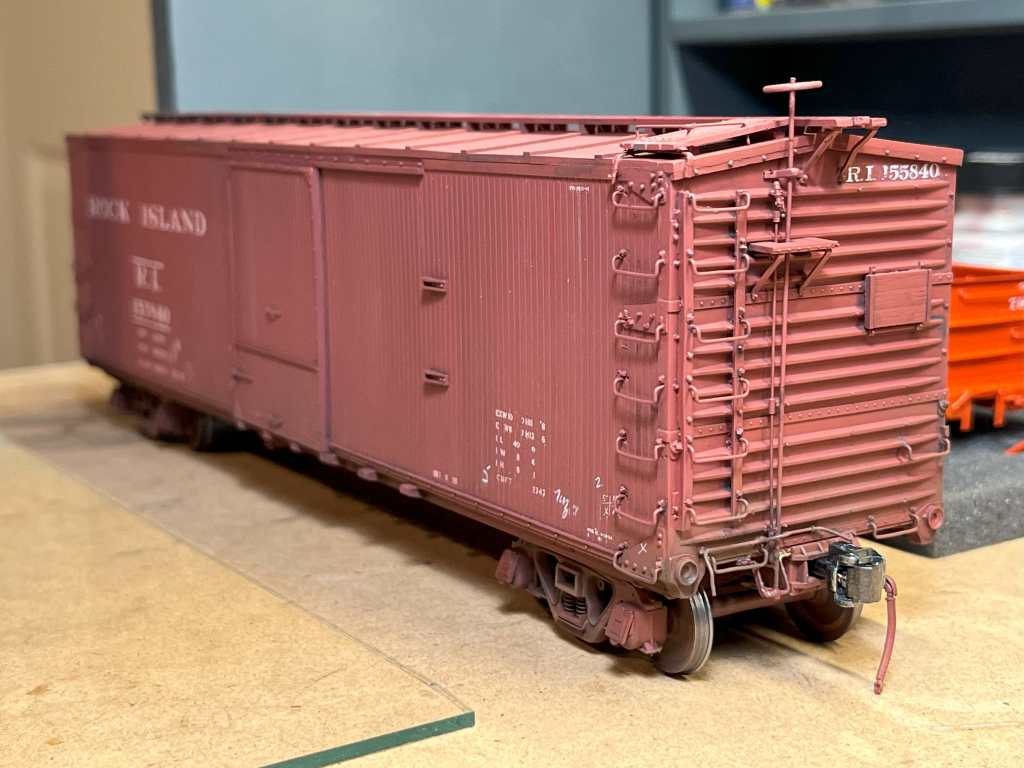
Trucks are old San Juan Proto48 San Juan Andrews trucks with Protocraft wheelsets. These trucks are a beast to assemble, but they are beautiful when finished and painted. Here’s the model ready for paint:

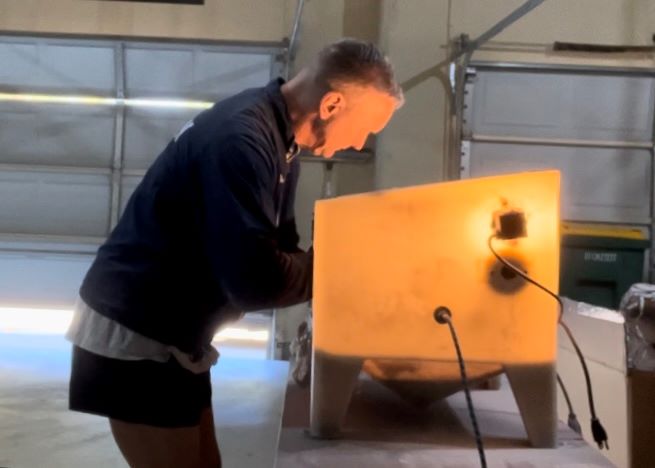
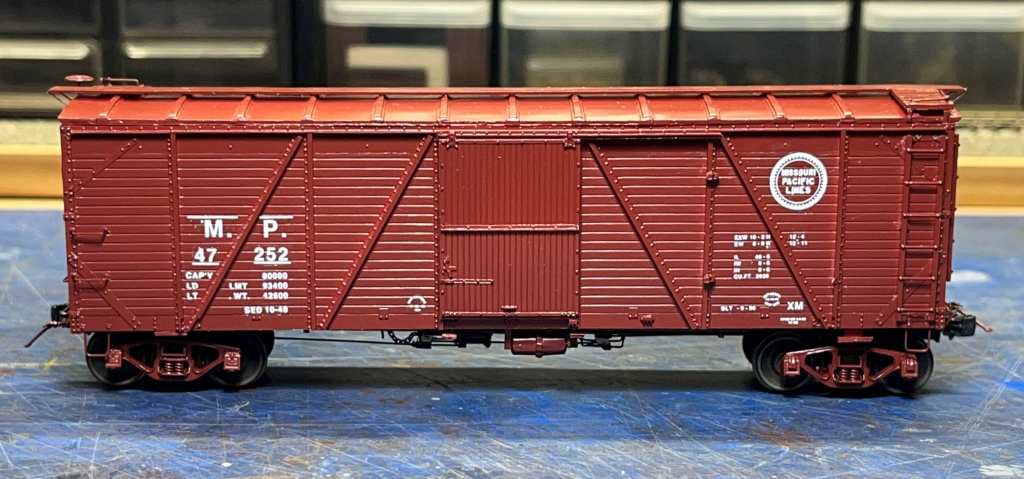
Once the build was complete I sandblasted the model in my old North Coast sandblasting booth, then washed it completely and set it aside to dry. When it was dry I painted it with Tru Color RI Freight Car Color with a little white added to weather it out little bit.

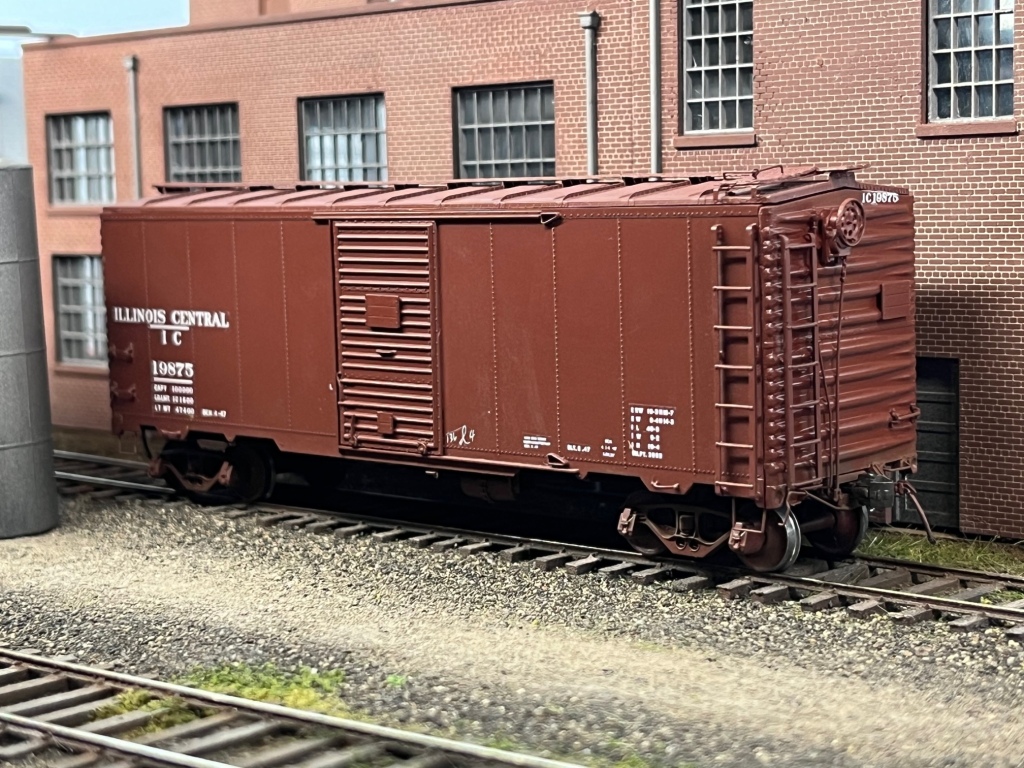
I used the Protocraft Rock Island Fowler box car set for this car, and had it cut it into a million pieces to make it work. Decaling took four evenings.

I weathered the model using just about every media available. I started with a shot of Dullcote to seal the decals, and then a second shot of Dullcote with some of the original paint added to tone down the deals. Then I lightly weathered the trucks and underframe with Testors Dark Tan, and then I used AIM Powders to further weather the ends, trucks, couplers, and other lower side sill applicances. Finally I used some artists pencils to weather individual sheathing boards and a few other items around the car. I did my best to not over-do the weathering.

Couplers are Kadee #745 in Protocraft coupler boxes. The couplers require a little filing and fiddling to get the couplers to fit. Highly detailed draft gear and striker plates are badly needed in both HO and O.

This model joined my small fleet of 18 completed Proto48 cars this week.

Back to the National…

The fastest driving route between St. Louis to Chicago is I-55. North of Springfield I-55 follows a portion of the old Chicago & Alton, which is now a high-speed Amtrak route with some UP freight service mixed in. Railfanning there isn’t very interesting but the sight of a train from the interstate perks me up a little bit.

On the way home I stopped for gas at McLean, about 90 minutes south of Chicago. McLean is located on old Route 66 at the intersection of Interstate 55 and Route 136. After I tanked up I noticed a depot off the railroad, literally right across from the gas station, so I went over for a picture or two. I noticed an “Open” sign and had a few minutes to spare, so I went in. I thought it was a typical small town museum, but to my surprise it was a model train shop.

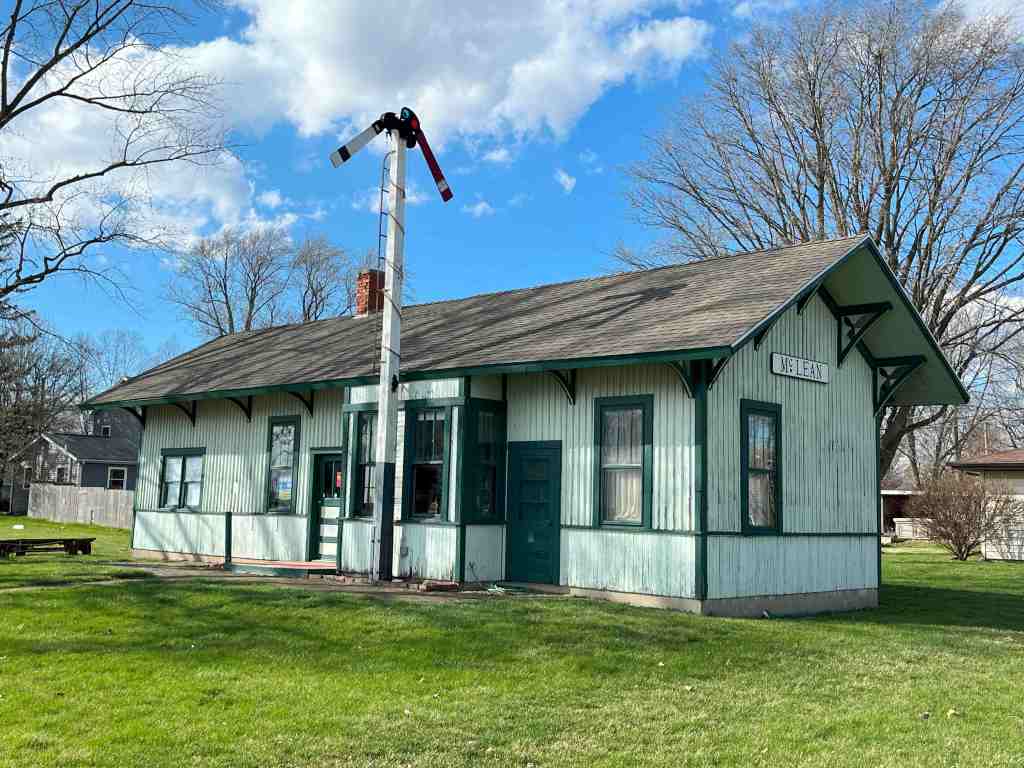
I had a nice talk with the shop owner, Mike. What a nice fellow. Mike explained that the depot was built a bock away on the C&A, and moved across to it’s current location in the 1970s. It was built in 1853 and is the third oldest depot remaining in Illinois. It is one of only two stations remaining that was passed by the Lincoln Funeral Train in 1865. Even the windows are old–they were replaced in 1910.

Normally I hate graffiti, but inside the depot is graffiti worth seeing, dating back to the 1860s.

Mike’s got a nice shop there and he does a lot of DCC installations and other specialty work. He’s got a good selection of kits and paint in particular. He’s got a little layout wedged into one of the former waiting rooms too. Mike’s too busy to build a website but you can find a little more info on the shop here, at https://www.horizonhobby.com/on/demandware.store/Sites-horizon-us-Site/default/Stores-Details?storeID=14705

Next time you’re on I-55 driving through McLean, stop by and say hello to Mike. Mike is a Gold Star Dad—his family has given a lot for their country. Your prayers his family are gratefully appreciated.

No. 192: Winter Freight Car Work

My winter freight car work actually began last July.

I didn’t get any modeling done all summer with the kids home from college. However, in July, I managed to break away from the fam for a few hours and attend the St. Louis RPM in nearby Collinsville, Illinois, where I gave a talk about building small layouts. I spent most of Saturday horsing around with old friends Greg Davis and Tom Christiansen. Greg was in the Army and during Desert Storm so we always have more to talk about than trains. Tom brought a huge display of FGE cars and we sat at his table for an hour or two and caught up.

During the course of the conversation Tom gifted me the car below. This is a heavily-kitbashed Accurail car, rebuilt to model one of FGE’s first series of plug-door insulated cars. Note it does not have ice hatches. Tom said this model was 10-inches too short for the prototype and wanted to know if I would like to take it. I said yes of course, and the car now resides in my basement. I have wanted a pre-1950 plug-door car for my car fleet for a long time and thanks to Tom I now have one.

Here’s a prototype picture from Bill Welch’s collection. I will need to cobble together decals from National Scale, K4 and Mark Vaught to get it done.

Meanwhile, in October, Charlie Duckworth asked if I could sandblast a 20-year-old Sunshine Models T&P box car for him because he wanted to repaint it. Charlie sent me the car, along with a gift–a Sunshine Models mini-kit to modify a three-bay offset hopper into one of MoPac’s cool home-made covered hoppers.

Here’s the car right out of the box on my layout. I think it looks pretty good as it is.

Here’s the old man blasting away in the garage. I should have a mask on!

After a whole 15 minutes of blasting, here’s the car ready for a wash and new paint. I got the car on Friday, blasted it on Saturday, and sent it back the following Monday or Tuesday.

About ten days later Charlie posted this photo on the Steam Freight Cars site. Less than a week after getting the car back he painted, decaled and finished it and it was already back in service on his railroad. Man, he works fast. Note behind this car is his new MoPac cement car–the same car he sent me the kit for. He built that already too!

Another new car on my railroad is the Rapido Union Pacific B-50-39.

Some of the guys on the Steam freight cars list panned this model, but I think it’s beautiful. I think the alternate center rivets look great. The running board is good, the stirrups are metal pieces and are finely crafted and many of the other details are really nice. Sure it could use a few minor upgrades and improvements, most notably to the brake gear and the lateral running board attachments, but I left the model just like it is. I replaced the trucks with Tangent Barber S-2 trucks with semi-scale wheelsets and changed out the couplers for Kadee “scale” couplers, but that was it. Well done, Rapido guys. I am beside myself waiting for the Enterprise covered hoppers.

Since most of my freight cars are weathered to some degree or another and I thought it’d be nice to have at least one new-looking car. Therefore my weathering plan for this model was to leave it “new” and moderately weather the trucks and underframe. I did so by applying AIM Products Dark Rusty Brown to the Tangent trucks and underframe, ends and couplers. Lately I’ve been applying weathering powders on my work bench in an old baking sheet–that works nicely to contain the mess, AND its easy to clean.

Here’s the car on the layout…

Finally, here’s one new model I finished recently. Illinois Central rostered a large fleet of 1937 Modified box cars and I wanted to add one to the car fleet. These cars were about as plain-jane as they came. The photo below is from the old Mount Vernon 1942 catalog.

Below. Here’s my finished car on the Hermitage Road layout.

Illinois Central ordered six series of 1937 Modified box cars between 1939 and 1940. Here’s an excerpt from Ed Hawkins’ 1937 Modified Box Car list, published on the Steam Freight Cars site, which can be found here: http://steamerafreightcars.com/index.html

My model represents a car from the 19500-19999 series, built by Mt. Vernon in 1940. Mt. Vernon isn’t too far away from my home in O’Fallon so having a model of a car built there is nostalgic. I made my model from an old Intermountain kit but I substituted a lot of aftermarket parts, including:

Underframe:

  • Cal Scale brake gear set
  • Tichy AB Valve, turnbuckles (for attachments to the brake gear clevises, and .0125 wire for air brake piping
  • Kadee #178 couplers, and Vulcan “HCG” trucks with semi-scale wheelsets
  • Smokey Valley scale coupler pockets
  • Yarmouth YMW-202 Stirrups

Sides:

  • National Scale Car Co. Tack Board set
  • Kadee bracket grab irons (holes drilled using the Yarmouth YMW-502 Template)
  • Tichy .015 wire for roping loops

Ends:

  • 5/5 Square Corner End YMW 1237E)
  • Tangent Apex “High” PS-1 brake gear housing, Apex brake wheel and Coupler Lift Bars
  • Hi Tech No. 6040 air hoses with brass mounts
  • Yarmouth Retainer Valves (YMW 0060)
  • Kadee bracket grabs

Roof:

  • Yarmouth laser-cut 40′ wood running board with laterals and etched brackets (YMW-255)

I also used a generous amounth of Yarmouth Eyebolts (No Collar) around the car to fix piping, grabs, lift bars, and grabs. The Yarmouth part, YMW-500, is the best and most economical part on the market–you get about 40 of them on one fret for four or five bucks.

I built the car in the usual manner–underframe and brakes first, then ends, then sides, and finally the roof. Here’s the model with all those darn parts applied:

I really like the Yarmouth laser-cut running board. It was easy to apply and the lateral running board supports allow the laterals to be applied quickly. Below, I used canopy glue to secure the running board and taped it down until the glue set. I slid a piece of cardstock underneath the lateral support to ensure proper spacing until the glue set the laterals in place.

Below. Here’s a photo of how I attach the Kadee bracket grabs. The Yarmouth template makes it easy. I tape the template in position and leave it there, and drill right through the tape and holes with a #76 drill.

You can also see I had a little difficulty getting the flat back of the Yarmouth end to square up to the Intermountain car side.

Yarmouth has so much useful stuff. You can order these Yarmouth parts and many, many more at https://www.yarmouthmodelworks.com/index.php/Home/Index.

The view below is a close-up of the car corner, showing some of the details added such as Kadee grabs, the roping ring, the stirrups, and so forth. The Kadee Vulcan trucks in the HGC (Heavy Grade Compound) material are really beautiful.

When construction was complete I sandblasted the model to clean up the finish and etch all those pesky metal and delrin parts so they will hold paint. Once the car was washed and dried, I painted the entire model including trucks with Tru Color TCP-165, Illinois Central Brown.

Decals are by K4. After the car was decaled I gave it a few light coats of Dullcote and then dusted the trucks, underframe and ends with a little AIM Light Brown weathering powders. Like the UP car I wrote about earlier, I wanted this to be a newer car so I didn’t over-weather it.

When I was building this blog post I noticed in the photos that I forgot to fix the running board end support on this end (below) and I totally forgot to attach one on the B end. What a Rookie Mistake. Back to the workbench it goes.

Here’s a few pictures before it heads to the RIP track. I think it turned out pretty nicely.

And here’s one more…

I was inspired to finish my car after seeing a few excellent examples at Naperville RPM in October 2023. The model below is by master-builder Ed Rethswich.

I didn’t record who built the model below, but I think it was Lonnie Bathurst. I found this one inspirational too, and it’s from the same car series as my model.

There’s another 12 cars on my “Finishing” list and I spent the long weekend in February working to get them done. Some of the new cars are shown below. There’s nothing too extraordinary about them–a few Westerfield cars, a Red Caboose CGW box car and a rebuilt Proto tank car to name a few. The notable exception is Rock Island 140714, shown below, which is a Sunshine Models 1923 car which came from Larry Sexton’s estate. I’ll write more on these models when I can find the time.

I hope you are all having a fun and productive week! – John Golden

No. 191: Setting up Hermitage Road 2

In the first week of December 2023, I finished construction and scenery for the layout—all the messy work—and transported the layout downstairs to its permanent home.

The layout had been in the garage since July where I did all the messy jobs like Styrofoam cutting, wood cutting and dirty scenery work. The layout’s permanent home is on a carpet remnant in the basement of our rented home, so I did all the dirty work outside where I didn’t have to worry about messing up the floor. I use real coal and real dirt for a lot of the scenery and boy is it dirty. I think it looks great but it gets everything filthy, especially the coal dust.

The first thing I had to finish was painting and reinstalling the backdrop. I painted the backdrop with Valspar Clear Blue Sky, Eggshell, which I’ve had on hand since 2012. I used the same paint for my original Ackley layout. It’s a neutral blue color suitable as a morning sky color.

Next I painted and reinstalled most of the front fascia. The black color used is paint I bought in Germany, at OBI, the German sorta-equivalent of Home Depot. The most important part of the paint is the RAL number which is 9005. RAL is an international paint code that allows a painter to match any color at any participating outlet. However I’m sure we can find a close-enough match at any Lowes or paint store. I use satin finish by the way.

Once all that was complete and the layout was vacuumed clean, my wife and I carried it down to the basement to its new home. The staircase to the basement is a “180-degree switchback style” (yes, that’s a real term) so we had to bob-and-weave the layout all the way down. Good thing I made it with lightweight materials. If that thing weighed 150 pounds we could’ve never got it down those stairs.

Below, everything is in place now, but there’s a lot of finishing work to do, reinstalling more fascia, reinstalling lights, routing wiring, and cleaning up surfaces. The traverse table was attached and then levelled.

The lights I used are 3200 Lumen LED shop lights I got at Menards. They were inexpensive and at 3200 lumens they’re plenty bright. I bought two of them and wired them together behind the top fascia.

Below. Here’s the top fascia installed and painted. The opening looks low but there’s plenty of room to reach in to uncouple cars. In a pinch you can reach through the top as well.

My buddy Clark Propst said the top fascia makes the layout look like a fishbowl. Well…yeah, I guess it kinda does…

The traverse table is wired and levelled. All Systems Are Go.

Finally, when all the installation work was done, I cleaned the track, plugged in the NCE and got an engine running. Everything worked well. The layout is just one electrical block and wiring is simple, so things run reliably and there’s not too much crazy stuff like wyes or three-way turnouts to troubleshoot.

Lights and power on…

…and now to set up staging for ops. Loaded coal cars go to Hermitage Coal Co. Box cars go to the grocery warehouse, the team track and Alcatraz Paint & Varnish. The reefer goes to the brewery (not yet built). The tank car goes to Southern Fuel & Oil (not yet built). The covered hopper and gravel car goes to the cinder block plant. The engine is a Stewart VO-1000 leased from my friend John Moenius.

My son Jacob, 22, and youngest daughter Kirsten, 17, ran trains for a short while.

My oldest daughter Kay, 19, came down the next day to run the engine for a while. The girls seem to like running trains more than my son. They’re patient.

Below, Kirsten is using what she calls the “power stick” which is her term for the uncoupling tool. When she came down with Kay, the first thing she asked me was “Dad, where’s the power stick?” I said “The what?” I guess I still have a lot to learn about the hobby.

I celebrated our first informal ops with a good beer my son brought from London. He went to a Bao restaurant in the small London Chinatown district and brought this beer back for me. Yes, it was terrific. It has one of the best labels out there too!

I hope you all have a productive weekend. – John G

No. 190: Scenery for Track on Hermitage Road

My wife and I went to Brugge, Belgium over Thanksgiving to celebrate my 60th birthday. Two of our three children were able to join us. We’ve been to Brugge many times and we love life there. It was a wonderful week and being there made us feel ready to live in Europe again.

For the railfan in me, a highlight of the trip was taking a train to Ghent for a day of sightseeing and waffle-eating. The ride was fast, clean, efficient, and of course electric. The train below was photographed at Ghent on our way back. This wasn’t our train but ours was a lot like this one.

Unlike Brugge, Ghent has a tram system throughout the city. Complex track and crossings are common in Europe. The photo below shows something extraordinary: a double-slip turnout right in the middle of the main avenue through downtown. There are several of them within a half a mile in Ghent.

Progress on Hermitage Road

Prior to leaving for Belgium, I started scenery work on the layout. I laid down some static grass and other material to make the layout more “complete”.

My friend Jeff Halloin sent a very inspiring photo from his Litchfield & Madison layout. He’s using pre-made scenic mats on either side of the tracks, and static grass in the back. It looks great. He’ll fill in some of the area in front of the backdrop with a scale cornfield. This isn’t the scenery I want for my industrial layout, but Jeff’s use of color contrast and texture contrast is second to none.

Here’s the basic scenery material used. The short list includes Silflor static grass, Woodland Scenics ground foam in various colors, Scenic Express leaves, AIM weathering powders, Elmers Glue, and a few different kinds of sifted dirt. I used a Noch GrassMaster II for static grass application and use Silflor static grass exclusively. I used Early Summer, Late Summer, and Yellow, or Autumn, in 2mm and 4mm lengths. To supplement the static grass, I also used Woodland Scenics blended green turf (green and yellow mix) and sprinkled on some Scenic Express coarse ground foam, and some Scenic Express leaf material.

Before I put down any scenery I took a long look at the layout to determine what I wanted to accomplish. I wanted ground cover around a few, but not all of the buildings, along the roads, and in a few places around and between the rails. I wanted much of that beautiful ballast work to show through, and a lot of the tie weathering to be seen.

Below. The Grocery Warehouse is supposed to be an older but still very active shipper. How much grass should I lay around the corners and edges? The photo below shows the first application.

I glued static grass down using the same mixture used for ballast: 50% Elmers Glue, 50% water, a splash of 70% rubbing alcohol and a few drops of dish soap. I thoroughly mixed this solution to a consistency of whole milk and apply it using a pipette.

Above. The first application of grass on the grocery warehouse. The end nearest the camera will be covered by the powerhouse, so the focus here is on ground cover along the track side of the building. The photo below was taken on the other side of the building after the second application. The second application is good–a little between the tracks and some good cover along the building foundation. The building itself still needs a little work…

In some cases I applied glue and scenery material to a specific place, like around roads or building foundations. In other cases I applied glue to a general area and let the liquid glue flow around ties and find low spots naturally. The glue fills in areas randomly which I think makes scenery more realistic.

Once glue is applied, I apply static grass. On this layout I am using a mix of about 40% Early Summer (bright green), 40% Late Summer (Dark Green) and 20% or so Yellow. For all applications I use a mix of 2mm and 4mm. I like the brighter early summer colors. I like to put down a medium-density application of static grass, then add a little Woodland Scenics turf on top, and then fill in with a little more static grass to taste later.

Above. In many cases the ground cover application looks heavy while the glue is drying. I wait a day for the glue to dry and then clean up the area with a vacuum. Some of the material comes up, leaving more randomness. If there are holes in the scenery that don’t look quite right, it’s easy to fill them in with a little glue and re-apply the static grass.

In some places—once the glue is dry—I like to “layer” the static grass by hitting the scenery with unscented hair spray and laying a second light coat of static grass or foam on top of the first layer.

Below. On this kind of layout, in an industrial area, randomness is a pretty good thing. The slight variation of ground cover colors, combined with the slight variation of the ties, makes a nice effect. When buildings and details and figures are added back in, the area will come to life.

Here’s another view of the same area above. The road needs a lot of work but the track and ground cover is coming along nicely.

Between the rails, I like to lay a combination of static grass and Woodland Scenics foam. I put the glue down between the ties with the pipette—never any glue on top of the ties—then add the scenery material. The next day I use a vacuum to clean up what didn’t stick. This usually leaves scenery between the ties which is what I want. Sometimes a little work is necessary to clear grass off of the tops of ties here and there. Below., the results are looking pretty good to me. The ground foam brings a little variety to the static grass.

In this shot below, I’ve added some leaf material to the ground cover, seen at the top right, and I really like it. I’ll add a little more of this in the coming weeks.

I moved around the layout, laying down grass in this manner a couple feet at a time, like along the roads, between rails, in certain spots around buildings, and so forth.

It is really easy for me to overdo static grass, so I take my time and do a little bit at a time, and come look at it again the next day and then decide if I want to add more. The scenery process below took three weeks, about a half an hour each day–and remember my layout is only eight feet long.

I think the results are pretty good.

Compare to a prototype photo on the old SAL lines in Savannah, Georgia:

Next, to finish the major scenery effort, I need to work on the ends of the layout. I have to install the overpass, add a few trees, and install photo backdrops. That’s still a lot to do. All that will come in due time.

To cap it all off…Ron Christiansen sent me this the other day. This is something he whipped up in his spare time. It’s outstanding. He called it “Broken down Oliver in the weeds”. I really like the flower buds in the foreground. Ron said he brushed on a little glue and then blew Scenic Express flowers across the scene.

I hope you all had a blessed Thanksgiving week. – John G

No. 189: Ballasting Track on Hermitage Road

Hermitage Road is slowly taking shape. In my last layout post I described painting and weathering rail and ties in preparation for laying down ballast.

I use dirt dug up from a roundhouse site for ballast. In the late 2000s I lived in Indiana and drove through Richmond, Indiana frequently. On one trip past Richmond I stopped and found the site of the former Pennsylvania Railroad roundhouse. I dug up a couple of bucketfuls of dirt and cinders at the roundhouse site, brought it home, sifted it, and stored it away in a few one-gallon bins for later use.

13 years and two layouts later, I’m still using that dirt for everything from ballast to ground cover. It is a mix of dirt, cinders, and all kids of other stuff, and it looks great because it’s the real thing.

For this layout, I used the Richmond ballast for track and most other applications, at right, plus some sifted dirt at center and some darker sifted dirt on the left.

Once the rail and ties were painted, I carefully poured on a little ballast at a time and carefully spread it on the roadbed with a small makeup brush. I did my best to keep the ballast off the rail and the tops of the ties, and below the level of the ties wherever possible. I do not want buried ties on this layout.

Next, I sprayed the ballast with 70% rubbing alcohol right out of the bottle using a fine-mist sprayer. Rubbing alcohol breaks the surface tension and secures the ballast in position.

The glue mixture I use for ballast is a mix of 50% Elmer’s Glue (Not School Glue), 50% water, a splash of 70% rubbing alcohol and a few drops of dish soap. The alcohol and dish soap help the water and glue mix, and break up surface tension. The consistency I like is like 100% milk.

Above. Finally—with the ballast still wet from the alcohol mist—I use a pipette to slowly add the glue mixture to the ballast. Sometimes I lay glue down along the outside of the ties and let capillary action suck the glue between the rails. Sometimes I just coat the whole track structure and that works okay too, but ideally I don’t want to put glue on top of the ties unnecessarily. In either case I make sure the glue covers the ballast completely and then wait a full day for the glue to dry.

The dirt ballast I use changes color when it’s glued into position. When dry it appears a little darker. That’s okay. I don’t want it to be black, but a dark gray with lighter and darker bits here and there is acceptable.

Once the ballast is completely dry, the weathered ties present a nice appearance. All that time painting individual ties is worth it.

Here’s a photo with the buildings back in–a mock-up of what’s to come. In the next post I’ll cover installing some static grass. This is the fun part of building a layout.

The Crossing

Meanwhile…I may have mentioned that Jeff Otto of Oak Hill Track Supply (https://www.ohrtracksupply.com/) custom-built a 29-degree crossing for the layout.

Jeff is an old friend of mine from my St. Louis RPM days. In my little opinion Jeff’s company is on the leading edge of custom track development. We’ve had long talks about track and details and all that. Fast Tracks gets a lot of press but Jeff’s new line of frogs is out of this world, and Jeff can personally build anything. He’s ahead of Proto87 Stores in many areas. Here’s Jeff at Chicagoland RPM below.

I emailed a drawing of my crossing to Jeff and he sent me a CAD a few days later. He scratchbuilt the crossing and brought it to me at the Chicagoland RPM at the end of October.

Jeff kept the crossing over the Chicagoland RPM weekend, using it to demonstrate his custom-building capability. And who wouldn’t—a 29-degree crossing doesn’t happen every day. Here’s the crossing in place…

…and here’s the crossing glued down.

Finally–and I’m getting way ahead of myself here–here’s a photo of the crossing painted and ballasted with some scenery already in place. I’ll describe track scenery in my next post.

I have a little more messy work to complete on the layout and then plan to bring it to the basement in the first week of December to set it up in it’s permanent home. December 1st will be just about ten months since I started construction.

In closing, a few weeks ago my daughter took this photo of me turning my clothes dryer into a kit. The heating element broke, and the guy at Lowes said I’ll need to completely disassemble the thing to replace the heater. He wasn’t wrong. It took me two hours to carefully take the thing apart. Luckily I didn’t have to freeze it first (that’s an inside modeler joke…). Anyway I was able to use model railroad skills like screw-drivering, bending, swearing, and soldering among other things to make the repair. Another hour later I had it back together with a few screws to spare. The best part was that it worked!

I hope you’re all preparing for a wonderful Christmas celebration. And I hope your dryer doesn’t break anytime soon! – John G

No. 188: Chicagoland RPM

Chicagoland RPM wrapped up last week and it was a great success and a lot of fun. The meet was hosted by Resin Car Works on Friday, 27 October and Saturday, 28 October 2023 at the Northern Illinois Conference Center in Naperville, Illinois. Around 400 modelers from around the US and Canada attended.

The NIU Conference Center, below. It was a gorgeous fall weekend.

The two-day event featured 35 clinics, 115 vendor and historical society tables, home layout tours, modular layouts in-house, a fun Friday evening social in the NIU atrium, and lots of camaraderie and fellowship. At right is Bonnie Hodina hard at work at the entry and registration table. Eric Hansmann is in the background behind the table. He did a lot of heavy lifting to make the event happen.

The image of Bonnie hard at work conjures up good memories. Here, below, Ed Hawkins is checking in with Tricia Lofton at Naperville RPM in 2004. Ed has done great work with model manufacturers over the years, and we always had a lot of fun wondering what secrets he kept in that briefcase.

Below. 20 years later, Martin’s vision is still alive at the NIU Center. This is one of two vendor rooms, both of which were busy all day. Model sales aren’t the main event at Naperville, yet they are an important part of RPM events. There were 30 model vendors and five historical societies present in 2023.

Below. Speaking of vendors, here’s Mike Gruber of Mainline Photos helping a customer with photo selection. Mike is a terrific guy. John Fuller was also at the event. Bob Liljestrand of Bob’s Photos was scheduled to attend, but he had hand surgery the week before and couldn’t make it.

Our hobby is continuously evolving and here’s proof. This is 3D Central, run by Matt Herman formerly of LokSound. Matt knows the hobby well and had some incredible 3D-printed models on display. 3D CEntral can be found online at https://3dcentraltrains.com/.

Here is Pierre Oliver, center, from Yarmouth Models. Pierre brought a lot of new models and even more stories to the event. Yarmouth’s website is http://www.yarmouthmodelworks.com/.

Below. Here is one of the two model display rooms. Incredibly, both rooms were full. Not a table went unused. I counted over 1,500 models on display. In the foreground is Loren Casey’s Monclair grain elevator, which was 3D-printed to match the prototype exactly. The elevator is located just southeast of Belleville, Illinois on the former Illinois Central lines.

Below. Clark Propst brought his fleet of nine M&StL RS-1s to the meet. Clark’s fleet includes one of every paint scheme–except the Mikan scheme–that Louie RS-1s carried in through the 1950s.

Seth Lakin brought a cool display of Big Four and Monon locomotives and cabooses for display.

My buddy Fenton Wells brough a great display of HO scale rolling stock. Fenton doesn’t model the easy stuff. Every model he builds is kitbashed or partially scratchbuilt, and every one is expertly built, painted and weathered. Fenton is a good friend and a fine man–very generous. He’s always happy to help his fellow modelers get it right.

Jim DuFour was at Naperville, and he brought and big display of beautifully-finished freight cars from his B&M layout. Jim’s is a great guy and his inspirational website site can be found on Flickr at https://www.flickr.com/photos/12504598@N04/albums/72177720312431719/with/53307077893.

I met Mr. Darrall Swift in the model room and we chatted for an hour late on Saturday afternoon. Darrall models the NP in the Pacific Northwest, and builds Northern Pacific freight cars from scratch. Here’s an example of one of his gondolas. Note the hundreds of individually-applied rivets. Unlike most of us who cut the heads off Tichy rivets and place them individually, Darrall leaves the stem in place and drills holes one by one to place the rivets. It is incredible work.

If you ever wondered “Why Naperville?” Darrall’s work is why.

The clinics are the main event at Naperville. Steve Hile put together the program which included 35 clinics, almost all of them presented twice. Here’s Jason Klocke, below, during his Modeling the Chicago Great Western clinic. Jason is a CN engineer and always gives a great show, and has one of the most inspirational layouts you’ll ever see.

Below. Here’s Clark Propst hard at work, presenting a clinic on his M&StL Story Branch layout. It was a fun clinic and as always I learned a lot from Clark. We were able to heckle him a little bit too, which makes Clark’s clinics a lot more fun.

Naperville is about the clinics, but it’s the people that make the meet what it is. Here are more modeling friends, from left to right: Lee Gustafson, Mike Schleigh, Bill Pardie, and Preston (I didn’t get his last name, sorry Preston!). Preston had that big smile on his face the whole weekend.

The Midwest Mod-U-Trak crew set up their modular layout in the NIU atrium right next to the registration tables. The layout is fantastic. Bob Koczik and crew had the layout up and operating on Thursday evening in about three hours.

Here is a meet on the HO scale layout. Trains were running from about 8:00 a.m. until 9:30 p.m. or later on Friday and Saturday. The layout operated flawlessly.

Here’s a much-earlier iteration of the HO scale ModuTrak. I took this photo at Naperville in 2005. The current layout is completely new. The Grand Master Bob Koczik can be seen in the teal shirt at center, 18 years younger.

The N scale Modu-Trak layout was set up along the walls of the larger vendor room. It is a fantastic layout as well. A crew of about eight guys had it up and running in about two hours. The operator behind the layout with the big smile is Bill Denton. He is one of the finest men you will meet in the hobby, and along with Mike Skibbe is the inspiration behind the N scale layout.

The N scale ModuTrak guys are very organized and have a website and blog available at https://www.modutrak.com/. That’s Chris Zygmunt with the friendly wave.

Below. More modelers. Right to left is Craig Wilson, Jerry Hamsmith and Ed Rethswisch. Ed is one of the best model builders I know. His work can be seen all over the RCW site.

Below. Tom Wencl (left) and Tom Klimczak (right). I spent about an hour horsing around with these guys in the model rooms.

On Friday evening we enjoyed a social hosted by the RCW crew in the NIU atrium. Attendees enjoyed food and drink and the vendors and layouts were all open for enjoyment. Here, below, is Tom Madden, the man behind many resin casting products we enjoy.

There’s plenty more about the meet online. You can find a good wrap-up on the Resin Car Works site at http://blog.resincarworks.com/2023-rpm-conference-wrap-up/ that includes links to a lot of other photos sites. Chicagoland was a good time and I hope we can all get together again next year.

Meanwhile, back on the layout…

Jeff Otto, the boss of Oak Hill model Railroad Supply, was at Naperville and delivered the last section of track for my Hermitage Road layout. I had asked Jeff back in September to build me a 30-degree crossing. He brought it to the meet and showed it off the whole weekend as a demonstration of his custom-building capabilities.

Jeff is a great guy and a lot of fun to talk to. He’s got a lot of new, cool products on the way. I talked to him a few times before the meet and sat down with him for an hour during the meet. His website can be found at https://www.ohrtracksupply.com/.

The crossing is beautiful and already in place on the layout. It looks great and is right up on the aisle where is can be seen and appreciated. More to follow soon as I get the last few tracks installed and operational.

It was good to see everyone at Naperville! – John G

No. 187: Hermitage Road 2: Fascia and Lighting

In the last post I described painting track and getting it ready for ballasting. Prior to ballasting, I felt it was important to install backdrops, fascia and lighting. In this boring post I’ll describe–briefly–how I installed backdrops, fascia and lighting.

Below. In early July I rented a table saw from Home Depot, bought some 1 x 2s and 3/16-inch Masonite, and got to work. Here is the layout in the garage all set for backdrop installation. Looks like I’ve got a coffee ready too.

I decided to hang the backdrop in three sections. One small section for each end, and one long 7-1/2-foot section for the back. I ripped Masonite to a height of 14 inches and installed bracing behind it to secure it to the layout. It is easily removeable for painting and backdrop work.

Installation couldn’t be more simple. After a few hours I had both ends and the back side of the backdrops installed. I glued and screwed the 1 x 2 strips to the back of the Masonite; the clamps are holding everything in place while the glue dries.

Below. Here’s a close-up of how the 1 x 2s are installed to support the backdrop. The clamps are cheap spring clamps I’ve had around the house for 20 years. This scene reminds me somewhat of the old article in MR that had a pictures of Andy Sperandeo building a layout based on the Santa Fe lines in Oklahoma. The caption read “Here’s Andy enjoying the hobby of C-clampling.” The humor there was so subtle it took me 20 years to understand it. I think the spring clamps would’ve made his work go faster.

Below. Here’s the from behind the backdrop. You can see how each piece–the ends and the back part of the backdrop–are built to be easily removeable units. At the bottom right you can see that I drilled holes to pass cords through.

End clamps, screwed into the 1 x 2s, keep everything tight.

With the backdrops in place, I can cut and install the front fascia. I started with the foundation for the lights. I installed a long 1 x 4 L-girder and screwed it in place on the backdrop ends. Two LED tube lights will be installed behind the L-girder. You can see how low I’m installing that light bar. I want the layout to be a really tight shadowbox. I think the effect will be dramatic.

Next I installed the top and side fascia. This was easy but I took my time to try and get everything lined up and get really clean edges. The curved corners on the end fascia were something I had on the previous version of Hermitage Road, so I made sure I kept that feature on this version. I measured the curves on the ends with a paint can and drew the circle, and cut them slowly with a jig saw. Then I shaped the curves with sandpaper to clean them up.

The layout was turned upside down to install the lights. I bought two 5000-lumen LED fixtures from Menards and installed the behind the wood “sub-fascia” (if that’s a word). They were easy to install. I ran the wires through the backdrop sides and around behind the backdrop to a separate power strip.

After another hour of sanding, shaping, screwing and finally getting everything secured in place, here’s the layout at the end of the day. Electric switches are installed on the far right to control the four power turnouts, and the NCE plug-in is up front. I plan on installing a shelf along the front of the layout as well to hold uncoupling sticks, drinks and other important stuff.

I’m getting a little ahead of myself here, but here’s what the layout looks like today, with the fascia partially painted and re-installed. It’s lookin’ good!

While I was installing the fascia I dropped my old, giant, heavy power screwdriver on the most important turnout on the layout–the wye at the entrance of the yard, seen at the bottom center below.

That wye turnout was an extensively rebuilt Shinohara switch since Micro Enginering doesn’t offer a wye. It was already fragile as it was. I bashed it good. Maybe next time I’ll try a Peco Code 75 wye to speed things along.

I smashed the points and destroyed all the working mechanism, and the detail parts went flying. I had to replace just about everything below the frog. As it is scratchbuilt, I had to get out all that track stuff and completely rebuild the darn thing. First I removed all the ties, de-soldered the points and built a replacement throwbar using a copper-clad tie. In the photo below you can clearly see the 1/2-inch tube I use as a channel for the Tortoise machine point-throwing rod.

An hour later here’s how it looked, below. I installed a new throw bar, replacement ties, replacement detail parts, and a new copper tie at the extreme end of the layout where the track will enter staging. It looks pretty sloppy, but after a little more cleanup, and paint and ballast, it’ll all blend in. There will be an overpass over this turnout so it will be partially obscured.

Well, that’s it. A pretty boring post, but necessary to publish to maintain the record. Ballasting next.

Oh, one last thing. Here’s a new freight car I got in July. This is one of the nice Rapido steel-sided B-50-16 cars. Ted Culotta, on his blog Prototype Railroad Topics, did a terrific review of these cars at https://prototopics.blogspot.com/2023/07/rapido-southern-pacific-b-50-15-ho.html. It’s worth a read. I’m fond of these cars, having seen and photographed a few in California back around 2000. I’ll have to dig out the slides and post them. The Rapido model is beautiful and I’m glad to have one in the fleet.

I hope you all enjoy your week and get some good modeling done! – John G

No. 186: Hermitage Road 2: Painting Track

With track laid, wired and tested on the new layout, it was time to paint the track. Painting track is a big step, as all the trackwork should be operational and perfect before painting. Painting usually introduces a few other problems, such as problems at switch points and so forth, so the more work done prior to painting, the better.

Hermitage Road is supposed to be an urban industrial layout, so weathering track appropriately is important. Here are a few motivational examples from around the U.S. that helped guide my painting.

Below. This view is in Kansas, on a Union Pacific siding just west of Salina. I find the ties interesting. Some are newere, some are old; the center tie looks rough-cut and is very old. The contrast between the rusty rail and weathered ties is stark. There’s no dirt on the rail. I also like the slight color variation in the ballast.

Below. This is in Sugar Creek, Ohio on the former PRR lines. I’m drawn to the contrast between the new and old ties, the rusty rail and weathered ties, and old ballast. Even though this is secondary main line track I’d like to replicate this on my industrial layout.

Below. Here’s another view from the UP in Kansas. The ties are closer together. There’s a definite contrast between some of the older and newer ties. Grass is encroaching on the ballast. Grass is pretty but it’s not too prototypical. The rail is clean but rusty.

Finally, one more view. This is at the old Seaboard yard in Savannah, Georgia. This is old rail, with foundry marks from 1930. The ties are newer and uniformly weathered. There’s a little ballast left but there’s a heavy layer of dirt (and probably cinder ballast) on top. One thing interesting about this photo is when there’s a layer of dirt on top–not ballast–the rail becomes dirty, not rusty as in the views above.

On my first version of Hermitage Road, I painted the ties individually and then went back and hand-painted the rail with Mr. Color No. 41. This worked fine although hand-painting the rail was a sloppy process and I put too much paint over the track details.

On this current version of Hermitage Road, I decided to paint the entire track structure first, using Testors Rubber as my color of choice. See below.

I was very surprised to find that the Testors Rubber appeared gray after painting. I didn’t want dark gray rail and ties.

I went ahead and left the rail gray for the time being and began weathering the ties individually as I did on the last layout. I used Model Master Japan Navy gray and Model Master Dark Tan, mixed in a plastic cup with Laquer Thinner, and painted various shades of the mixtures randomly on the ties. I put a few heavy drops of paint in the cup and mix them in the cup, like a palette, and mixed various shades of gray and tan in the cup. The Lacquer Thinner tends to break down the paint a little and force some variation in the finish. The overall effect is quite realistic in my opinion.

Below. Here’s the result. Again, randomly painting ties creates good contrast, which is what I want. Some ties were completely painted over with either tan or gray, or a mixture of both, and some ties were highlighted. Some ties were left unpainted in the original Testors Rubber color.

Here’s a view of the layout with tie-painting in progress. Here it can clearly be seen how ties were painted gray randomly.

Below. In a few places I went back over the rail with Mr. Color No. 41.

I waited a week and then went back over some of the ties again with the same gray, tan and rubber paint, mixed with Lacquer Thinner.

A closer view of the weathered ties. Getting some variation in the weathering is important. In many cases the weathering brings out the very subtle wood-grain detail in the Micro Engineering ties.

Yes, it takes time to paint each tie, or every other tie, but on a small layout it’s worth the time spent. I would say it took about two hours to go over most of the ties. The end result will be worth it.

Below. One last prototype view, this one on a former NYC siding near Litchfield, Illinois. The dark rail, light, weathered ties and joint bar are all important features.

Below. After painting the ties I cleaned the rail again and tested operation. Everything ran well, and looks good. You can see where the dummy crossing will be installed in the foreground. Jeff Otto at Oak Hill is building it for me. His website is https://www.ohrtracksupply.com/ and he has some really terrific stuff.

The next post will be fascia installation and after that I’ll post on ballasting track. I’m getting a little ahead of myself again, but here’s a view of some of the ballasted track below.

In closing, when looking for the Savannah Yard track photos I came across a few old scans of slides I took 40 years ago, in 1983. This view below is a southbound Onieda & Western coal train on the former Seaboard Air Line main track just south of Savannah, Georgia. The main track went under Abercorn Extension very near where I was going to college at the time at Armstrong State. I photographed this train standing on the overpass zooming south to Burroughs Junction.

I’m pretty sure I shot this on Ektachrome. I hated Ektachrome but it was cheap. It was very unforgiving.

Anyway, in those days one could see just about every Family Lines engine in Savannah. This train has an L&N SD-40, a Clinchfield SD-45-2, a Family Lines SD-40-2, and an SCL-painted engine up front, most likely a GP-40-2 or an SD-45. Those were the days!

I hope you all have a blessed week! – John

No. 185: Hermitage Road 2: Rebuilding the Alcatraz Paint & Varnish Co.

The blog has been “dark” since the end of April. It’s been a VERY busy summer for me and my family, and now it’s time to get back to it.

I mentioned in my last post–way back in April–that I had a full left knee replacement on April 5th. Recovery was much more difficult than I expected. The first two weeks were tough and I was in a lot of pain. After three weeks I was able to start working from home, and about that time I got back to the YMCA and was lifting weight to supplement physical therapy. PT went well and after six or seven weeks I was even able to jog a little bit.

Below. The doc worked quite the kitbash job. Guess which parts are Titanium.

During those weeks at home I got a little modeling done. The most significant work accomplished was construction of a new Alcatraz Paint & Varnish Company building for my new Hermitage Road layout. Here’s the story.

I have no photos of the real Alcatraz (the paint company, not the prison) which was a block north of the old Seaboard Air Line Hermitage Yard in Richmond. All I have is a Sanborn drawing which shows track going through a couple of buildings and a small tank farm. Alcatraz is the facility on the left. Apologies for the fuzzy image.

On the old Hermitage Road layout, I scratchbuilt a version of Alcatraz based somewhat on the Sanborn map footprint alone. Here’s that first version still under construction:

I wasn’t happy with this version, and over time I looked for a prototype to use as a pattern for a new structure. Some time later I found this building, below, at the Litchfield (Illinois) Museum. This small factory was on the New York Central in downtown Litchfield. The building is long gone–along with the Big Four–but I like the feel of the building, with lots of windows and doors, an irregular shape, a smokestack and a little water tower.

I bought the Walthers Machine Shop kit, as seen below, and over the course of a week I kitbashed it into a reasonable facsimile of the factory shown above.

Here are the major kit components. The building will be placed between two roads with the back end against the backdrop, in a space fourteen inches long and five inches deep.

Here are the first few cuts. I find it difficult to cut up a fifty-dollar kit, not quite knowing if it’s going to work out or not.

Below. After much time and testing, and measuring and gluing, here’s how the building took shape. Note that the track goes between the buildings. I like this layout as trains will disappear between the buildings for a short time, and cars will be spotted out of sight. Like the previous version of Alcatraz, I also plan to have pipes and wires going overhead between the buildings.

Below. An overhead view of the building layout. The building sits between two roads which are drawn on the subroadbed. The tanks are from the Walthers Cornerstone Industrial Storage Tanks set, kit number 933-3514.

Another view, below. I need to find a small, square smokestack and some good roof vents for the building.

Below. Another view of the new building with a box car spotted in position.

Finally, here’s a view of the layout with the new Alcatraz building in place. The track that serves Alcatraz continues on to serve the Richmond Block Company, at far left, just like the prototype. The large building at right is the grocery warehouse. The black thing at the far right is the traversing table.

Below. Here’s the building with the first coat of paint.

Later in May I presented an online clinic on Hermitage Road 2 for our informal online group, Ron’s Train Club. Ron’s Train Club is hosted by Greg Bueltmann, who is the Superintendent of the NMRA Michiana Division. Greg is a terrific guy and is doing a great service for the hobby, hosting and posting hundreds of online clinics given by the group.

Here’s the link to my layout presentation:
https://us02web.zoom.us/j/77593752886?pwd=L2NZV1lRSDJVamlOcEVocmxhZlo2dz09

Here’s a direct link to the presentation hosted on You Tube:

Greg’s complete Michiana Division Video Archive can be found at http://michiana-nmra.org/videoarchive.php. There are hundreds of videos posted of all kinds of different subjects. They’re nice to have going in the background while you’re at the workbench.

I hope you have a wonderful week! – John G

No. 184: MoPac Howe Truss Box Car, and the Generosity of Old Friends

Three weeks ago I got an e-mail from an old friend, telling me to expect a box in the mail. He didn’t provide any details. He just said “I’m sending you a box of goodies.”

I do a lot of model and parts swapping with other guys, so much so that getting a box of swapped goodies a month is a regular thing. But this box was different. It wasn’t a box of cut-up decals or leftover resin parts, or somebody’s leftovers. This box included two beautifully finished HO scale models, with a note that said “These models are a blessing from Bill Welch”. Wow.

The car above is a Sunshine ATSF GA-49 gondola. I’d never seen one before I opened the box. It’s an awesome car and it immediately became one of my favorite models. Below is another Sunshine car, this one a rarity–an N&W G-1 low-side gondola.

In the 15 or so years I ran St. Louis RPM, I learned that our hobby is full of very, very generous people. People who are generous with their time, and their hard work, and their money. People willing to share everything they’ve got. I was humbled then, and I’m again humbled today. These models are indeed a blessing.

Here is another new model received at about the same time, below. This is one of the new Rapido UTLX X-3 8,000-gal tank cars. It is gorgeous. I’m working on it this week, adding placards, new trucks, and a few more things to really sweeten it up. Well done, Rapido!

Our old friend Richard Hendrickson campaigned for a high-quality, injection-molded model of the X-3 for decades. If he were around today, I think he’d be well-pleased with this model.

MoPac How Truss Box Car

I wrote last fall that I was working on about 14 new HO scale models. Most of them are still in various stages of completion; this one–a Sunshine MoPac single-sheathed box car–was finally finished in March. Here’s the story.

According to Ed Hawkins, Missouri Pacific rostered over 4,000 1924-design Howe-truss single-sheathed box cars. I like single-sheathed cars, and given those high fleet numbers I feel that I can justify one on my railroad. I bought this old kit from my friend Tim O’Connor last year and built the car last fall and finished paint and weathering right about the time I received the other models mentioned above.

Below. There’s nothin’ like opening up a box of Sunshine Models goodness!

Here’s the prototype car. This is a Joe Collias photo from the early 1950s. Classic MoPac. The Sunshine car is a perfect replica.

Below. I began the build with the underframe, since that’s my least favorite stage of assembly. Below, I’ve followed the instructions and placed the valve and reservoir based on prototype photos included with the kit. I prefer to use Cal Scale brake gear but didn’t have the entire set on hand, and had to use a Tichy reservoir instead.

I connected the chain to the clevis at the cylinder piston using a short, .0125-inch piece of u-shaped wire. That allowed me to make an easy connection to the piston. Credit for that technique goes to Jerry Hamsmith.

Below. Here’s a photo of the completed underframe. I forgot to photograph it during assembly; here’s a view after the car was completed. This view also shows that I used Kadee #178 coupler boxes on the model, and Tahoe 40-ton trucks, and Hi Tech air hoses with brass brackets. It also appears that I used two different brands of “Code 88” wheelsets–see how the truck on the left has wheelsets polished to silver, and the one of the right has wheelsets polished to some other color??

You can also see that I tested using an artist’s pencil on the bottom of the weathered underframe. The lighter boards are where I tested a dark red pencil before I used it to weather around the rest of the model.

The superstructure was finished next. First I sanded the sides and ends the same height and length, to make sure the model makes a perfect box, and then added ladders, grabs and sill steps on the car sides. The roof has a running board made from Evergreen styrene, although I used the lateral running boards that originally came with the model. The A end was simple to finish–just ladders, a few grabs and a tack board and that was about it.

The last assembly completed was the B end. I finished the model per the instructions and used the prototype photo included in the instructions as an additional guide. The ladders are old Details West parts included int he kit. The air line attachment is a brass Hi-Tech details part. The sill steps are by A-Line, and the running board supports are by Yarmouth. It was a straightforward build; fairly easy since attaching a “stemwinder” brake wheel usually goes a lot faster than a power brake housing.

When construction was complete I sandblasted the model in my North Coast sandblast booth, and after I washed it and set it aside to dry, I painted it with Tru Color MoPac Freight Car Red.

I applied the kit-supplied decals in my usual manner, using Microscale Micro-Sol during application, and once dry using Walthers Solvaset to snuggle the decals around the details.

After a few applications of Walthers Solvaset to make sure the decals settled nicely, I sealed the finish with two coats of a mix of 50% Testors Dullcote, 25% Testors Glosscote and 25% paint thinner to set the decals.

Once the Dullcote was dry, I mixed a solution of black artist’s oil paint and paint thinner and dribbled it on each surface of the car (roof, sides, ends, and trucks) and allowed that to dry. That solution, which I’ve described frequently on this site, allows the black paint to settled in around the details and between the side sheathing boards, creating a dirty, well-used appearance. I also added a little more black weathering on the roof, this time carefully brushing on some AIM “Soot” weathering powder. Finally I colored some of the boards with a dark red, almost maroon artist’s pencil I mentioned earlier to highlight some of the sheathing boards. Then I sealed everything with one more shot of the Dullcote mix.

The last step was fixing the completed, weathered underframe to the superstructure. After a quick re-check on operating quality (coupler height, truck swivel, no wheel binds, etc.) the model was declared ready for service. This was a very enjoyable build and this one is definitely a keeper.

Looks like I need to untangle that chain!

Meanwhile, progress on the new Hermitage Road layout is progressing nicely. This week I finished a new version of the Alcatraz Paint and Varnish Co., using a Walthers locomotive shop kit. Here’s the model, and I’ll explain how I did it in a later post.

Hope you all enjoy your weekend. – John G